Configure barcode symbologies
To let Destiny assign barcodes, you need to define the barcode symbology you plan to use. Barcode symbology options depend on the installed Destiny products.
| example: You have Resource Manager and Textbook Manager. You make a change to the Textbooks barcode symbology. Even though Resource Manager also has textbook resources, your change only applies to the textbooks that live in Textbook Manager. Or, you have a Resource Manager-only site. The only product-related barcode symbology available is Resources. |
Define the symbologies
Before Destiny can assign barcodes, you must define the symbologies you plan to use.
- Select Admin > Site Configuration > Circulation sub-tab.
- Under Preferred Barcode Symbologies, use the drop-downs to select each resource’s barcode symbology.
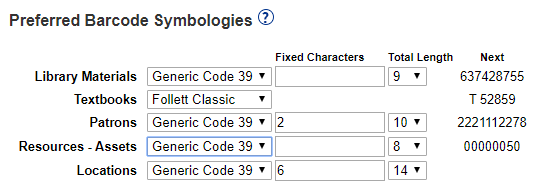
- Do one of the following:
- If a barcode contains less than 8 digits, select Follett Classic from the list.Note: Follett Classic is not supported in Resource Manager.
- If a barcode contains 8 or more digits, the Fixed Characters field and Total Length drop-down appear. Complete as needed.
- Click Save.
| notes: You can use the same or different symbologies for library materials, instructional media materials, textbooks, patrons, resources and locations. If you ordered your barcodes from Follett Software, LLC, all of the required information is listed on the packing slip you received with your barcodes. If you did not purchase your barcodes from Follett, and you are not sure how your barcode symbology is configured, contact your vendor. |