Navigate Destiny
Destiny offers efficient navigation between tasks, sites, and Follett Software products.
See how to:
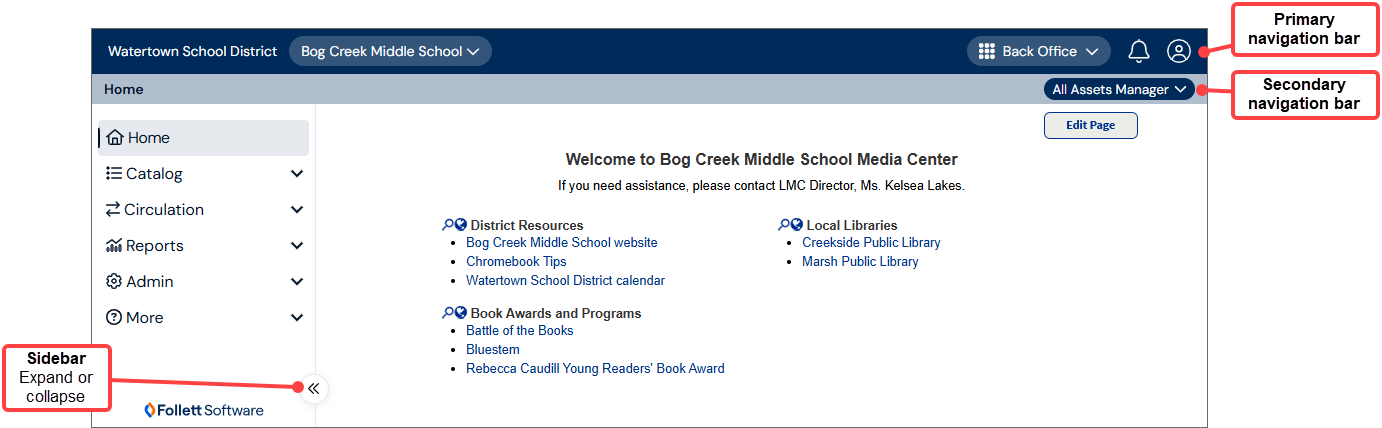
Use the primary navigation bar to switch between sites, pages, and products, and customize your experience
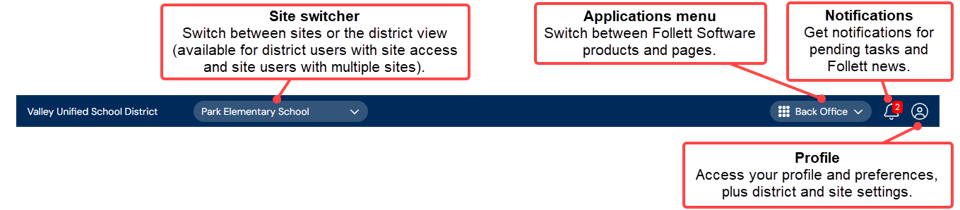
The primary navigation bar, available at the top of every page, lets you quickly jump between areas in Destiny and across Follett products.
The system remembers where you left off if you go back during the same session.
Applications menu
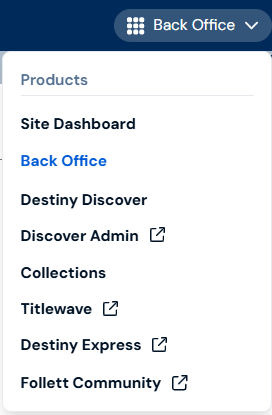
Use the Applications menu ![]() to navigate between Follett Software products and pages. The options you see will vary based on your access level, region, and product access. The full list of site-level options includes:
to navigate between Follett Software products and pages. The options you see will vary based on your access level, region, and product access. The full list of site-level options includes:
- Site-level options:
- Site Dashboard (includes Destiny AI: Data Assistant, if enabled)
- Back Office
- Classroom Library
- Destiny Discover
- Discover Admin
- Collections
- Titlewave
- Destiny Express
- Help Desk
- Fundraising Manager
- Work Orders
- Schedules
- Drawings
- Follett Community
District-level options:
- District Dashboard
- District Back Office
- • District Setup (Destiny Administrator only)
Applications menu example
(Options will vary.)
Profile
Use the Profile icon ![]() to customize preferences and settings. Learn more
to customize preferences and settings. Learn more
Use the secondary navigation bar to see where you are in the product, change the language, or change the Destiny product
The primary navigation bar, available at the top of every page, lets you quickly jump between areas in Destiny and across Follett products.
The system remembers where you left off if you go back during the same session.
Applications menu
Use the Applications menu ![]() to navigate between Follett Software products and pages. The options you see will vary based on your access level, region, and product access. The full list of site-level options includes:
to navigate between Follett Software products and pages. The options you see will vary based on your access level, region, and product access. The full list of site-level options includes:
- Site-level options:
- Site Dashboard (includes Destiny AI: Data Assistant, if enabled)
- Back Office
- Classroom Library
- Destiny Discover
- Discover Admin
- Collections
- Titlewave
- Destiny Express
- Help Desk
- Fundraising Manager
- Work Orders
- Schedules
- Drawings
- Follett Community
District-level options:
- District Dashboard
- District Back Office
- • District Setup (Destiny Administrator only)
Applications menu example
(Options will vary.)
Profile
Use the Profile icon ![]() to customize preferences and settings. Learn more
to customize preferences and settings. Learn more
Use the sidebar to navigate to Destiny tasks
The primary navigation bar, available at the top of every page, lets you quickly jump between areas in Destiny and across Follett products.
The system remembers where you left off if you go back during the same session.
Applications menu
Use the Applications menu ![]() to navigate between Follett Software products and pages. The options you see will vary based on your access level, region, and product access. The full list of site-level options includes:
to navigate between Follett Software products and pages. The options you see will vary based on your access level, region, and product access. The full list of site-level options includes:
- Site-level options:
- Site Dashboard (includes Destiny AI: Data Assistant, if enabled)
- Back Office
- Classroom Library
- Destiny Discover
- Discover Admin
- Collections
- Titlewave
- Destiny Express
- Help Desk
- Fundraising Manager
- Work Orders
- Schedules
- Drawings
- Follett Community
District-level options:
- District Dashboard
- District Back Office
- • District Setup (Destiny Administrator only)
Applications menu example
(Options will vary.)
Profile
Use the Profile icon ![]() to customize preferences and settings. Learn more
to customize preferences and settings. Learn more
Explore sidebar menu options
The primary navigation bar, available at the top of every page, lets you quickly jump between areas in Destiny and across Follett products.
The system remembers where you left off if you go back during the same session.
Applications menu
Use the Applications menu ![]() to navigate between Follett Software products and pages. The options you see will vary based on your access level, region, and product access. The full list of site-level options includes:
to navigate between Follett Software products and pages. The options you see will vary based on your access level, region, and product access. The full list of site-level options includes:
- Site-level options:
- Site Dashboard (includes Destiny AI: Data Assistant, if enabled)
- Back Office
- Classroom Library
- Destiny Discover
- Discover Admin
- Collections
- Titlewave
- Destiny Express
- Help Desk
- Fundraising Manager
- Work Orders
- Schedules
- Drawings
- Follett Community
District-level options:
- District Dashboard
- District Back Office
- • District Setup (Destiny Administrator only)
Applications menu example
(Options will vary.)
Profile
Use the Profile icon ![]() to customize preferences and settings. Learn more
to customize preferences and settings. Learn more
Navigate district-level tasks (for district users)
The primary navigation bar, available at the top of every page, lets you quickly jump between areas in Destiny and across Follett products.
The system remembers where you left off if you go back during the same session.
Applications menu
Use the Applications menu ![]() to navigate between Follett Software products and pages. The options you see will vary based on your access level, region, and product access. The full list of site-level options includes:
to navigate between Follett Software products and pages. The options you see will vary based on your access level, region, and product access. The full list of site-level options includes:
- Site-level options:
- Site Dashboard (includes Destiny AI: Data Assistant, if enabled)
- Back Office
- Classroom Library
- Destiny Discover
- Discover Admin
- Collections
- Titlewave
- Destiny Express
- Help Desk
- Fundraising Manager
- Work Orders
- Schedules
- Drawings
- Follett Community
District-level options:
- District Dashboard
- District Back Office
- • District Setup (Destiny Administrator only)
Applications menu example
(Options will vary.)
Profile
Use the Profile icon ![]() to customize preferences and settings. Learn more
to customize preferences and settings. Learn more
Navigate to district setup (for Destiny Administrators)
The primary navigation bar, available at the top of every page, lets you quickly jump between areas in Destiny and across Follett products.
The system remembers where you left off if you go back during the same session.
Applications menu
Use the Applications menu ![]() to navigate between Follett Software products and pages. The options you see will vary based on your access level, region, and product access. The full list of site-level options includes:
to navigate between Follett Software products and pages. The options you see will vary based on your access level, region, and product access. The full list of site-level options includes:
- Site-level options:
- Site Dashboard (includes Destiny AI: Data Assistant, if enabled)
- Back Office
- Classroom Library
- Destiny Discover
- Discover Admin
- Collections
- Titlewave
- Destiny Express
- Help Desk
- Fundraising Manager
- Work Orders
- Schedules
- Drawings
- Follett Community
District-level options:
- District Dashboard
- District Back Office
- • District Setup (Destiny Administrator only)
Applications menu example
(Options will vary.)
Profile
Use the Profile icon ![]() to customize preferences and settings. Learn more
to customize preferences and settings. Learn more