Set up a self-circulation station
Library self-circulation stations let students check out and/or check in materials and resources they need, freeing you up for other tasks. With Destiny Library Manager, a self-circulation station can be set up to protect student information and privacy in just a few steps.
Create a self-circulation station login
To let students check out and/or check in their own materials, first you need to create a new access level. Then, create a patron record to use as a login for the self-circulation station.
To create a new access level:
- Select Admin > Access Levels.
- At the bottom of the page, click Add Access Level.
- In the Access Level field, type a name, such as Self-Checkout, Self-Checkin, or Self-Circulation.
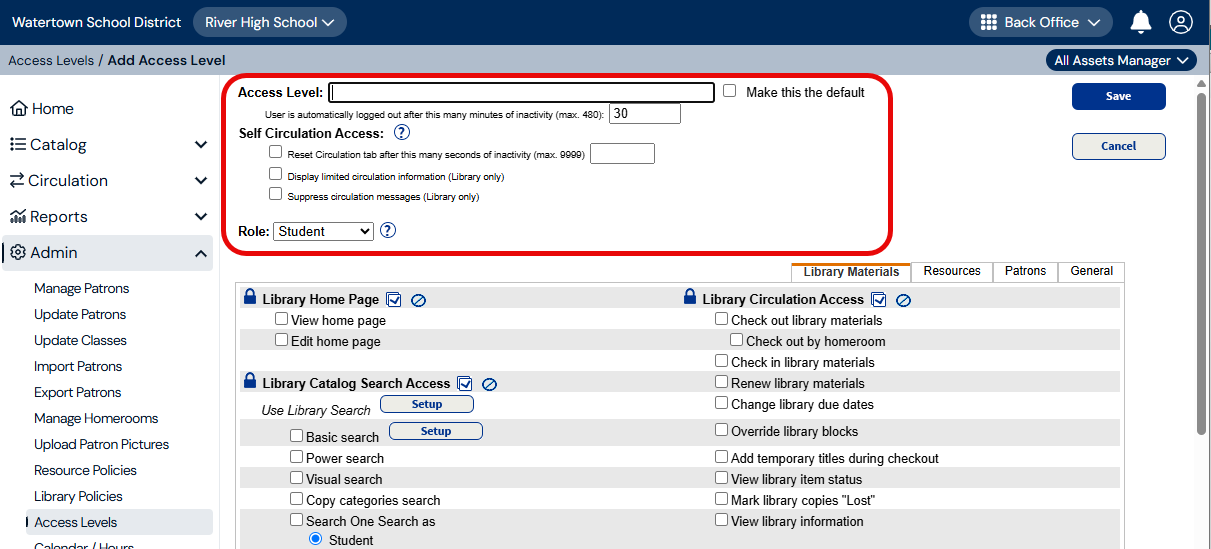
- In the User is automatically logged out after this many minutes of inactivity (max. 480) field, type 480 to set the inactivity log-out time to the maximum.
- Do any or all of the following:
- Select the Reset Circulation tab after this many seconds of inactivity (max. 9999) checkbox, and type the number of seconds of inactivity before the Circulation tab resets. In Destiny, this is the preferred method for resetting the Circulation tab. Consider how many students are typically at the circulation checkout station and how many books a student can check out.Note: Students can click the Reset Checkout/ Reset Checkin button when they are done using the station if they want. Or, you can print the Reset command code, available in Destiny Help, and students can scan it when they are done. See the complete list of Library Manager Circulation Command codes.
- If you want only patron first name, picture, and last item checked out to show during checkout, select the Display limited circulation information (Library only) checkbox.
- If you want the hold and block messages to direct patrons to talk to their librarian during checkout and checkin, select the Suppress circulation messages (Library only) checkbox.
- If you want to let students check out materials, from the Library Circulation Access section, select the Check out library materials permission. If you want to let students check in materials, select the Check in library materials permission.
can
- Click Save.
| Notes:This Self-Circulation access level requires students to enter or scan their barcode number. If you want to let them find their record by searching with a keyword or browsing a patron list, select Admin > Access Levels > Patrons tab. In the Patron Circulation Info Access section, select the Barcode not required to find patrons permission. Keep in mind that this method lets students access other students’ patron records without entering a barcode.You can hide the student’s barcode for confidentiality. Select Admin > Access Levels > Patrons tab. In the Patron Circulation Info Access section, make sure the View patron barcodes permission is not selected. |
Once the Self-Circulation access level is created, add a patron record with that access level:
- Select Admin > Manage Patrons.
- Click Add New Patron.
- Type a name, such as Checkout, Checkin, or Circulate, and a barcode number.
- From the Access Level drop-down, select the access level you created.
- Type a User Name and New Password to use for the self-checkout station.
- In the Confirm Password field, type the same password.
To set up the self-circulation station each day, log in as the Self-Circulation user you created.
Helpful Hints for Self-Checkout Station Setup
- To hide the browser menu, task, and button bars, press F11 on your keyboard. This action also brings you back to the original view.
- If you want to require students to scan a barcode rather than type it, consider removing the keyboard.
- Self-checkout stations can be set up using any device. You might set up a tablet with the Follett Destiny Back Office app.
- If you let students check in materials, you can instruct them to select Check Out or Check in in Destiny, or you can provide Check In and Check Out command codes for them to scan.