Delete patron information
The Delete sub-tab of Update Patrons lets you delete patron information. You can use it to delete multiple patrons, recommendations, or notes.
This is useful when a large number of patrons are no longer associated with your library or school, or for cleaning up patron records at the end of the school year.
| Important: Be careful when deleting patron records. Any items patrons have checked out are marked as lost; fines and refunds are deleted. All of their history will be removed and cannot be re-added. Follett recommends leaving last year’s seniors in the system for one to two years before deleting those records. |
To delete a single patron record, use the Manage Patrons Delete feature.
To delete patron information in a batch:
- Select Admin > Update Patrons > Delete sub-tab.
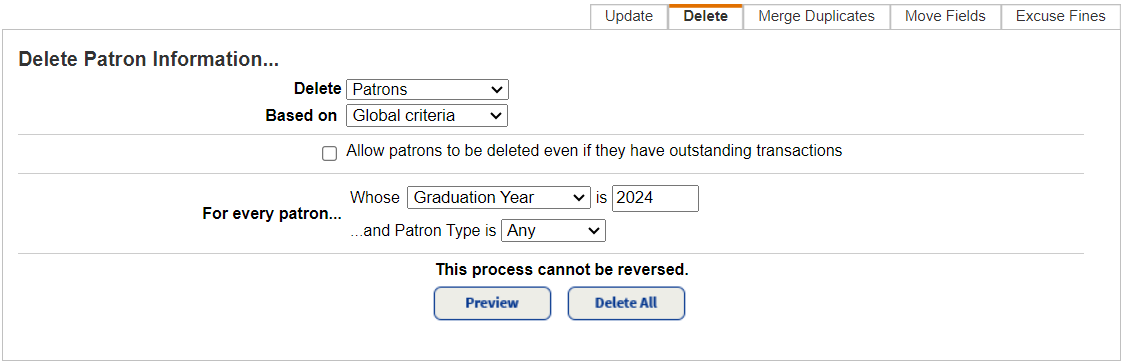
- From the Delete drop-down, select the information to delete:
- Patrons
- Notes
- Recommendations (Library Manager only)
- From the Based on drop-down, select the information on which you want to base the deletions:SelectThen…Global criteria
- From the Whose drop-down, select the patron field on which you are basing the deletion.
- In the is field, select or enter the contents of the field that you want Destiny to find.
- If the …and Patron Type is drop-down appears, you can leave the default Any, or use the drop-down to limit deletion by type.
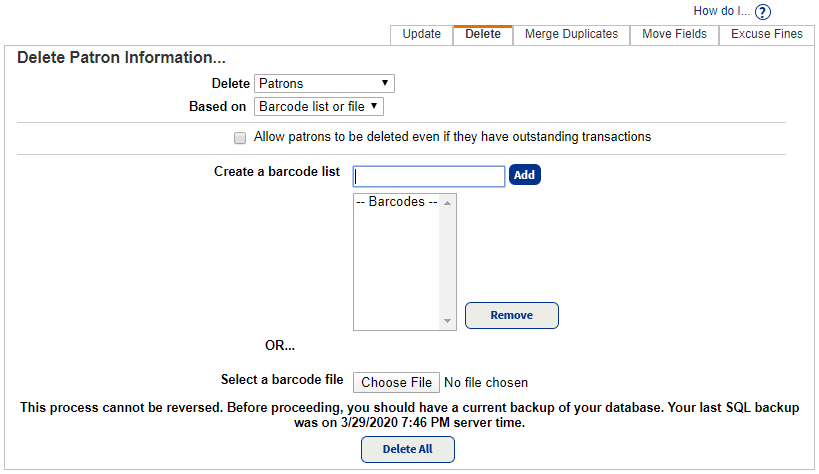
- To select an existing file, click Browse (or Choose File).
- To create a list, use the Create a barcode list field to scan or type the barcodes.Note: To remove a barcode number from the list, select it and click Remove.
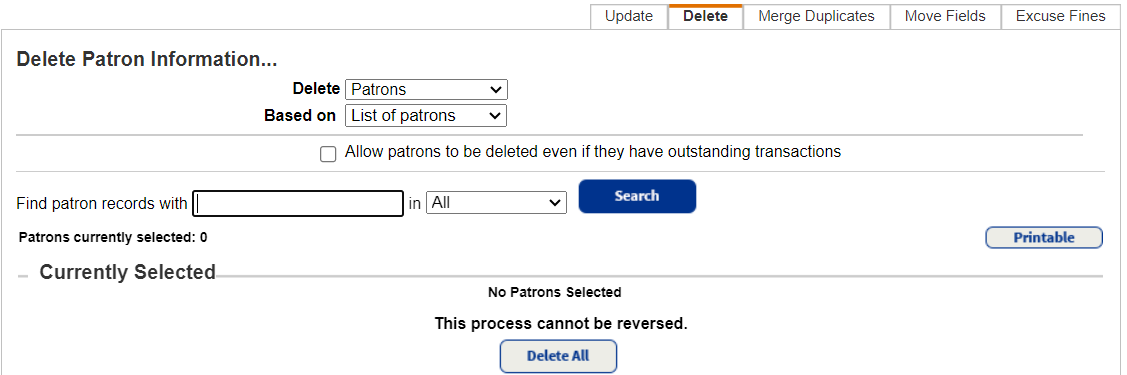
- In the Find patron records with field, enter a value.Note: If you do not have the whole name or word, enter part of it, followed by *, or use a question mark (?) to replace a single letter.
- In the drop-down next to in, select the field to search.
- Click Search.
- In the list that appears, find the correct patron and click Select. The patron moves to the Currently Selected section at the bottom of the page.
- Repeat these steps for each patron.
- By default, patrons with outstanding transactions are preserved. If you don’t want them to be, select Allow patrons to be deleted even if they have outstanding transactions.
- Based on what you are deleting, do one of the followingIf deleting:Then:Patrons by Global Criteria
- To preview the records before deleting the, click Preview.
- When the Job Manager opens, click View.
- If the deletions appear correct, click Delete All on the summary to delete the patron records.
- On the verification message, click Yes to proceed. The Job Manager appears.
- Click View to see the Job Summary.
Job Summary
For each Delete job or preview, Destiny generates a Job Summary showing how many records were deleted or skipped and lists the records.
Previews include the ability to delete all, or edit a patron in the list.
The summary lists the following information.
If you deleted patrons:
- Patron name
- Patron barcode number
- Patron type
- Whether the patron was deleted or skipped (and the reason)
If you deleted patron notes:
- Patron name
- Patron barcode number
- Patron type
- Contents of the note
Important notes are displayed in red and designated by Important.